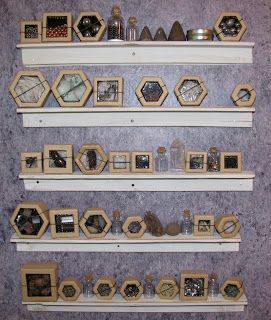
A while back I bought up a whole slew of little craft paper boxes in various shapes and sizes. They were nesting boxes, ranging in size from about 1" across to 2" across, and came in square and hexagonal. They had been clearanced down to just pennies a box, and I couldn't pass them up, even though I had no clue what I was going to do with them. After playing around with them for a while, I came up with a wonderful use. I now have cute little shelves made of 2" L shaped molding full of my little treasures and supplies on display.

Here's how:
Remove the lids from the boxes, and trace a cutting line on the top of the lid apx 1/8 -1/4" away from the outer edge. Use an X-acto knife to cut along your line and remove the 'window' from the lid of your box.
Now you need a sturdy piece of clear plastic sheeting to use as your window pane, and the plastic packaging that comes with the everyday odds and ends you buy is perfect. You know the plastic packaging that comes on on darn near every little electronic gizmo you buy? That annoying wrapper with the melted together seams that you just about need a cutting torch and machete to get open? Well that stuff is perfect! And it can be found on many other items as well. It's crystal clear, with a good sturdy thickness. It took me a bit of scrounging through my boxes and closets, but I eventually found enough of it to make all the panes I needed.

Use the 'window' you already cut out of your lids as a template. You are going to want to cut your panes larger than the template, but small enough to fit into the inside your your box lids. Once you have those cut, use a simple white craft tacky glue to glue them into your box lids. Remember people, your plastic pane goes inside the lid. Set them aside to dry completely.
Now you are going to glaze your panes. This will add stability, and seems to increase the transparency of the plastic. I used Inkssentials Crackle Accent, but any thick 3 dimensional glossy medium should work. If you use the Crackle Accent like I did, it will not crackle and craze throughout the whole surface due to the properties of the plastic surface beneath it. But it will crackle along the edges of your pane where it touches the craft box, creating a frosty edged - winter window look that is very fun. Whatever you choose to use, be sure and remove any bubbles by dragging them to the surface with a pin, and allow to dry completely.
I chose to paint the inside of my boxes. I used black for a more dramatic look, but you could use white to keep things lighter, or use a color that coordinates with the room they will be in.
After filling them, I use little black rubber bands to keep them closed should they get knocked off the shelf by a frisky cat.

I now have lovely little shelves full of little curiosities begging people to take a peek inside. And you will find everything from assorted ball bearings and the cast off shells of robin's eggs, to insect husks and gem stones. So please enjoy, and leave me a comment if anything is lacking in my instructions.
Visit my shop at etsy.

No comments:
Post a Comment